An action-camera mount is the hardware that holds a camera to a board, a body, a helmet or a pole. This hub covers the main mount families used in surf and coastal shooting, how to check that a mount fits your camera, and how to look after adhesive, clamps and hinges in salt water.
Quick answer: match the mount to the camera's mounting system first, then to the place you want to attach it. GoPro-style cameras use built-in mounting fingers and a 1/4-20 thread for tripods; some other makers use their own quick-release or magnetic systems, so confirm fit on the maker's page and add a tether to every mount.
Surf camera gear on Amazon
Sponsored
As an Amazon Associate, SurferPix earns from qualifying purchases. See our affiliate disclosure.
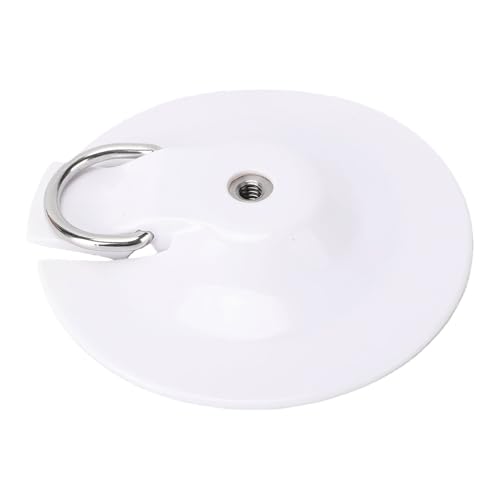
A flat adhesive mount for attaching a small action camera to a helmet, board rail, or other hard surface, aimed at users who want a fixed angle without a clamp mechanism. Adhesive mounts have a rated lifespan and should not be reused indefinitely.
Reflects criteria around adhesive strength claims and a documented rated lifespan rather than assumed permanent hold.
A reusable clamp mount for attaching a camera to gear, a railing, or a board rail without adhesive, aimed at users who want to move the mount between sessions or objects. Clamp tension and jaw width vary by model.
Reflects criteria around reusable clamp tension range and material corrosion resistance for repeated saltwater exposure.
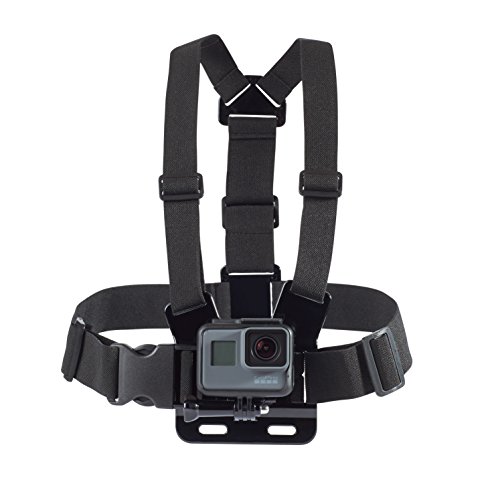
A body-worn harness mount that positions a camera at chest height for a stable, hands-free point-of-view angle during a session. More comfortable for longer sessions than a mouth mount but changes the framing angle.
Reflects criteria around adjustable strap sizing over a wetsuit and stated retention/tether compatibility.
A bite-style mount giving a distinctive low point-of-view angle, aimed at experienced surfers comfortable with the reduced communication and comfort trade-off during a session. Not recommended as a first mount for beginners.
Reflects criteria around food-safe/mouth-safe material claims and manufacturer-recommended tether pairing for safety.
Most action-camera mounts depend on one question: how does the camera attach to the mount? GoPro cameras use built-in mounting fingers that slide into a matching buckle, and GoPro's pages describe a 1/4-20 thread that works with industry-standard tripods. Other makers use their own systems, such as the dual-direction quick-release described on DJI's Osmo Action 6 page, or magnetic latches that GoPro also sells as accessories. The result is that mounts are not universally interchangeable, and an adapter adds a point of failure.
When people ask whether all action cameras use the same mount, the honest answer is that many share a common GoPro-style interface, but not all, and not in every generation. Check the camera's maker page for the system it uses, and check the mount's page for the cameras it names. A mount that fits loosely is a mount you will lose.
Check the camera's own mounting system before choosing any mount.
Mount types compared
Common action-camera mount types
Mount type
Attaches to
Good for
Watch for
Adhesive base
Flat or gently curved surfaces such as a surfboard deck
Fit to the helmet model; not designed for the water
Suction cup
Smooth, non-porous surfaces
Boats and vehicles
Needs a clean, flat surface; check the rating
Tripod or pole
1/4-20 thread
Shore and boat shooting
Wind and salt on threads
For board mounting specifically, go to the surfboard camera mounts hub, which covers nose and rail positions in depth.
Mount positions from the mount-types table above.
How to choose a mount
Start with the camera. Find the mounting system on the maker's page, including any adapter that comes in the box.
Decide the position. Board, body, pole, helmet or vehicle. Each has a family of mounts.
Check the surface. Adhesive mounts need clean, dry, wax-free surfaces. Clamps need a tube or rail of the right diameter. Check the stated range.
Look at the retention. A safe mount has a tether point. If it does not, plan an extra attachment.
Consider weight. A camera inside a housing weighs more than a bare one. Check the mount's stated limits.
Think about angle adjustment. Pivot arms, ball joints and extensions give flexibility, but every joint adds leverage and a loosening point.
Plan for salt. Metal parts should be corrosion-resistant, and screws should be easy to rinse and dry.
Our rule of thumb is simple: pick fewer, sturdier mounts and learn them well, rather than collecting dozens that you rarely use.
Using mounts safely in the water
A mount that detaches in the water becomes a projectile and a lost camera. Pair any board mount with a manufacturer-recommended retention tether connecting the camera to the mount base, and make sure the other end is fixed to something that will not come loose. Check the mount before every session by pulling on it, and replace it if there is any sign of the base lifting or the plastic cracking.
Body mounts add other risks. A mouth mount sits in your mouth during a wipeout, so choose one you can remove instantly and avoid hard edges. A chest mount can snag on a leash. In busy lineups, a loose camera or mount is a hazard to other surfers, which is one more reason to tether everything. Our tethering and wave impact guide covers the forces involved.
Surf camera gear on Amazon
Sponsored
As an Amazon Associate, SurferPix earns from qualifying purchases. See our affiliate disclosure.
Prices and availability were accurate when retrieved from Amazon and may change. Retrieved Nov 17, 2026.
Adhesive, clamp and hinge care
Adhesive bases need preparation and patience. Clean the surface, remove wax, dry it fully, press firmly for the time the maker states and wait for the full curing time before going in the water. Temperature affects curing time and long-term hold, so avoid installing in direct hot sun or a cold garage outside the maker's stated range. Adhesive has a lifespan, which is why replacing a base on a schedule is cheaper than losing a camera.
Clamps and hinges need rinsing. Salt crystals collect in thumbscrews, ball joints and pivot points, and they seize if left. After each session, rinse the mount in fresh water, work the joints under the flow, dry them and store them loosely tightened. Check that screws are still snug, since vibration and wave impact loosen them. Replace any part with visible corrosion or stress marks, because a failing thumbscrew gives little warning.
Common mistakes
Assuming every mount fits every camera. Check the camera's system and the mount's named models.
Installing over wax or damp surfaces. Adhesive will not bond properly.
Using a mount before it has cured. Follow the maker's curing time.
Skipping the tether. No mount is immune to detaching.
Stacking adapters. Each joint adds leverage and slop.
Leaving salt on the hardware. Rinse and dry after every session.
Buying many mounts at once. Learn one or two angles first.
Care in salt water
After each session, rinse every mount, buckle and screw in fresh water, wiggling joints under the flow. Dry them with a cloth, then air-dry in the shade before storing. Check for white crust on metal, which means salt has dried and corrosion may follow. Lubricate moving parts only as the maker advises, since the wrong lubricant can degrade plastics or attract grit.
Inspect straps for fraying and buckles for cracks; sun and salt weaken webbing over time. Keep a small bag of spare screws and a thumbscrew in your kit, since these are the parts most likely to disappear. Our guide on rinsing strap hardware after salt-water sessions shows a short routine you can adopt.
A worked example: choosing a mount for a first surf session
Suppose you own a GoPro-style camera and want your first in-water footage. Begin with the question of position. If you want a hand-held angle, you do not need a board mount at all; a floating grip with a quick-release base is simpler, safer and cheaper. If you want a nose angle, you need an adhesive base on the deck, a tether and the patience to let the adhesive cure. If you want a rider's-eye view, you are choosing between a chest mount and a mouth mount, and the mouth mount carries real comfort and safety questions that you should weigh before you buy.
Next, check the interface. The camera's maker page will state the mounting system, and the mount's page will name the cameras it supports. If one of them says "adapter required", treat that as a flag and ask whether you can avoid it. Then check the load. A bare action camera is light, but a camera in a housing, with a battery grip or a light, is heavier and puts more leverage on the joint. Finally, plan the rinse. A mount with several moving joints will need more care than a one-piece base, so choose the simplest design that gives you the angle.
Follow this order with any new mount: position, interface, load, retention and care. If a candidate fails any of the five, move on to the next one. It is quicker than returning gear after the first rough session, and it keeps your kit small.
No. Many cameras use a GoPro-style interface with mounting fingers and a 1/4-20 thread, but others use their own quick-release or magnetic systems, such as the dual-direction quick-release DJI describes for the Osmo Action 6. Check the maker's page for the camera's system.
What is a GoPro-style mount called?
GoPro describes its mounting interface as mounting fingers: folding prongs that slide into a matching buckle. Its pages also describe a 1/4-20 thread that fits standard tripods. Accessory makers often label products as GoPro-compatible to show they use this interface.
Is there a chin mount for the GoPro?
Yes, third-party makers sell chin mounts, typically designed for helmets, and they attach using the GoPro-style interface. Confirm the mount fits your specific helmet. For surfing, a mouth mount or board mount is more common; see our comparison guide.